Effortless and delicious, this 4-ingredient no-knead bread comes together in under 4 hours! If you're new to bread baking, this is the perfect place to start. With just 10 minutes of prep and no kneading required, simply let the dough rise, then bake until golden brown and crisp on the outside, yet soft and chewy inside.

Baking bread can be intimidating. It may seem like a complicated process, but it's honestly quite simple, especially this no-knead recipe! If you're a first time bread maker then this recipe is for you!! You'll impress yourself and everyone who eats it! I promise.
And I wasn't kidding when I said it only takes 10 minutes of prep time. Yes, you do still have to wait for the dough to rise, about 2-3 hours, but that doesn't require any physical work on your end. Once the dough has doubled in size, transfer it from the bowl to a parchment lined dutch oven and bake!
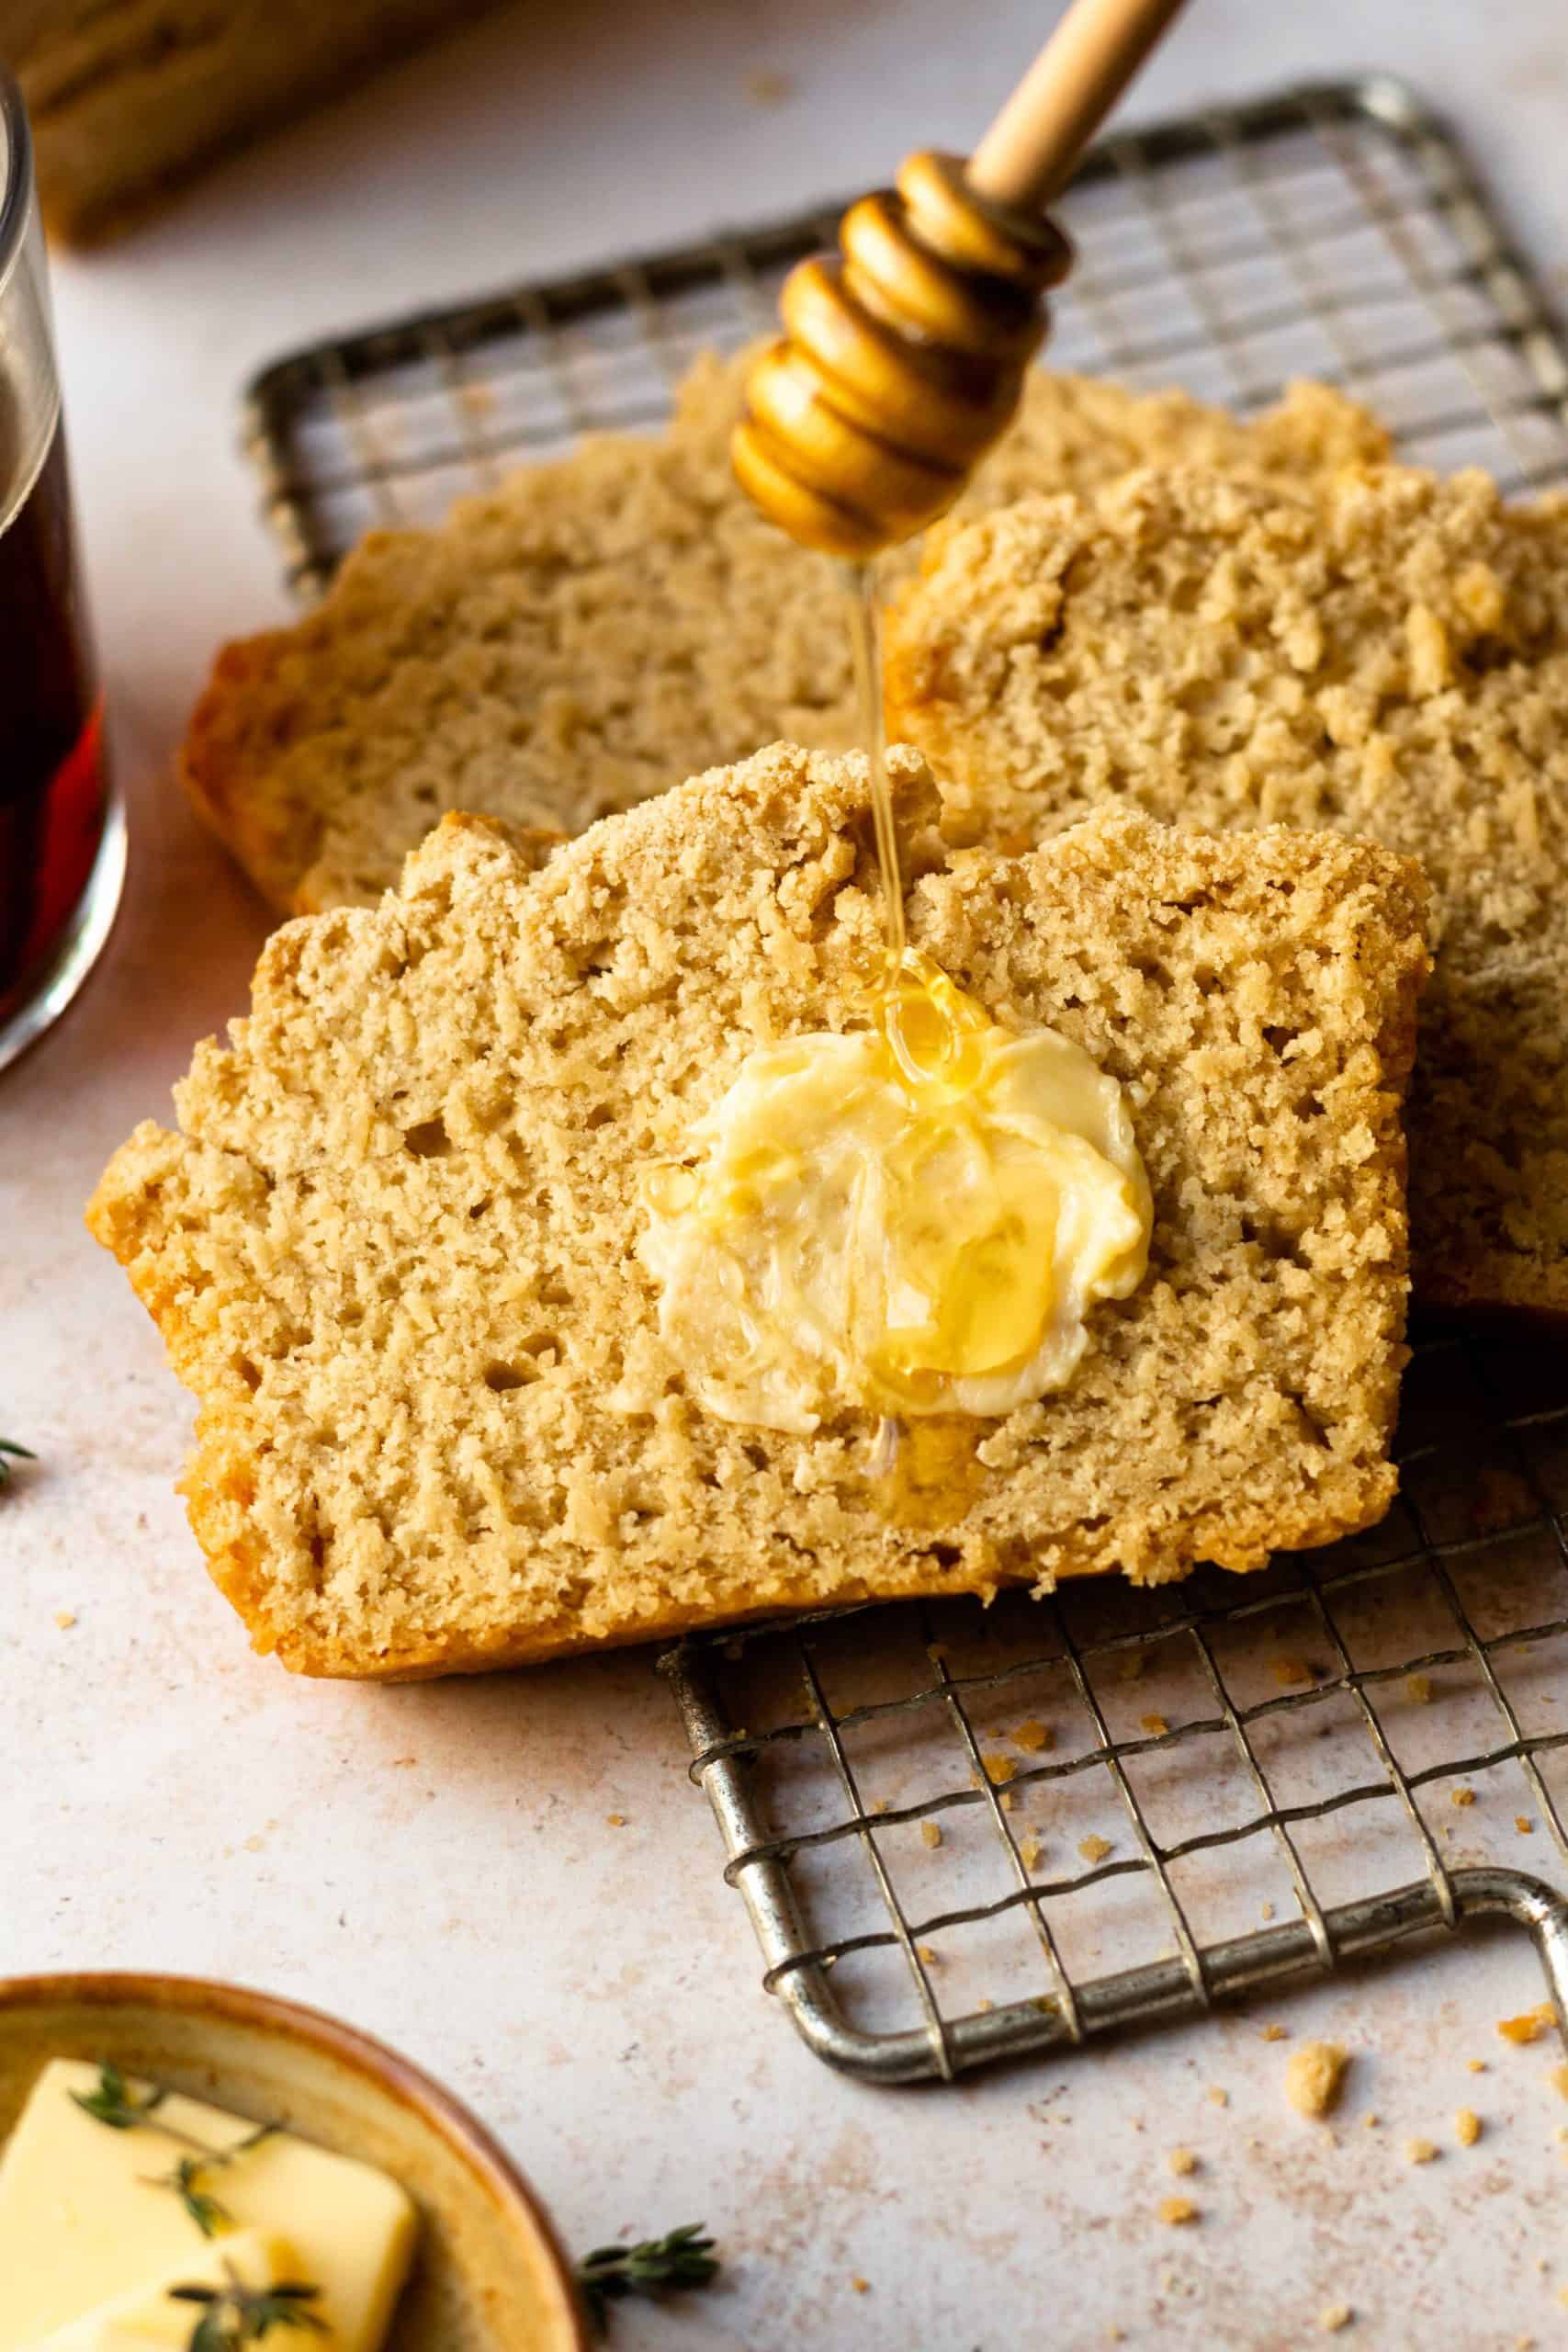
This no-knead crusty bread is seriously perfect for so many things! Dipping in soup, making grilled cheese, serving with eggs, toasted with butter and honey... the options are endless.
This is soo tasty and easy - my family now requests it almost weekly! - Jacque

Why you'll love no knead bread
- Quick and simple. This is honestly the quickest and easiest homemade bread recipe, and it tastes amazing! What's not to love!?
- Beginner friendly. This recipe is practically foolproof and the perfect place to start if you want to learn how to bake homemade bread. Your family will love it! And the more loaves you bake, the more comfortable you will become.
- Healthier than store bought bread. This bread is made with just 4 simple ingredients: flour, water, yeast and salt. Compare that to the mile long ingredient list that you'll find for any store bought bread.
What is no knead bread?
No knead bread is meant to be a quick and simple way to make delicious crusty artisan bread without all the extra bells and whistles and, as the name says, without kneading the dough. It's meant to be rustic, easy and very beginner friendly. It's a fast way to get a homemade loaf of bread on the table.
Traditionally, you knead bread dough using your hands (or a dough hook attachment on your stand mixer) until the dough becomes smooth and elastic before you let the dough rise. But, no knead bread skips that step!

Only 4 ingredients needed
- Bread flour. I recommend bread flour, but if you're in a pinch you can get away with using all-purpose flour. Bread flour has a higher protein content, giving the bread that more soft and chewy texture we all love when it comes to crusty bread!
- Instant yeast. For a quick rise I use instant (quick rise) yeast. I provided instructions in the notes section of the recipe card for using active yeast, which will increase the rise time to about 12-18 hours - this is great for an overnight rise!
- Salt. Don't forget the salt! Once, I forgot to add salt and the bread was NOT good. I ended up throwing it away. It's amazing what salt adds to the recipe. So much flavor. Without it, all I could taste was yeast.
- Water. The water should be between about 110-120 degrees F. If the water is too cold the yeast won't activate. If the water is scalding hot it will kill the yeast. BUT, don't let that scare you. The temperature doesn't have to be exact. You just want the water to be about the temperature of warm bath water.
Tips & tricks
- Spoon and level the flour. As always, I recommend using a spoon to scoop the flour into the measuring cup and then level it off with a butter knife. Scooping your measuring cup directly into the flour packs it in too tight and you'll likely end up with too much flour. Too much flour = dry bread.
- The temperature of your home will determine how quickly the dough rises. Cooler temps will result in a longer rise time, while a warm environment will cause the dough to rise faster. If my house is chilly during the winter months, I like to turn my oven on to the lowest temperature for 1-2 minutes then turn it off and place the bread dough inside. This gives the dough a warm place to rise. You could also set the dough next to a warm air vent in your house. Don't be afraid to get creative, if need be!
- Refrigerate the dough if time allows. Once the dough has doubled in size, place the covered dough in the refrigerator for up to 12 hours to enhance the flavor of the bread. This is also a great make ahead option! But, if you don't have time, that's perfectly fine too. I've baked this bread plenty of times without refrigerating it first.

Commonly asked questions
What if I don't have a dutch oven?
You can still make the bread! The reason behind using a dutch oven to bake bread is that it locks in steam, allowing the center of the bread to rise and evenly bake without the outside of the bread cooking too fast (otherwise the outside would burn and the center of the bread would still be doughy). Removing the lid during that last 10-15 minutes lets the steam release, allowing the bread to get its crusty, golden exterior.
But, if you don't have a dutch oven, here is a good article I found on different ways to create steam in your oven without one: How to Make Crusty Bread without a Dutch Oven. But, I highly recommend buying a dutch oven if you plan to make baking bread a regular thing. You can also use your dutch oven to make roasts, soups and stews. Click here to check out the dutch oven that I have and love! I like Lodge because their prices are reasonable and the quality is good.
How do you shape no knead bread?
There's no one way to shape no knead bread and it certainly doesn't need to be perfect. No knead bread is meant to be simple and rustic. But, here's what I like to do. Stretch the dough into a rectangle shape then fold the ends over the center, roll it up, and use my hands to shape it into a ball and create a little surface tension. In this video I show you how!
Can I use active yeast?
Yes! You can definitely use active yeast in place of instant yeast, but please keep in mind that the dough will also take much longer to rise with active yeast, about 12-18 hours at room temperature.

Recipe variations
Inclusions are a fun way to kick up the flavor in your bread! Once your dough is combined and shaggy, mix in your inclusions, using your hands if needed. Here's a few ideas!
- Jalapeno cheddar. 2 cups shredded cheddar cheese and 1 diced jalapeno.
- Cinnamon raisin: 2 tablespoons brown sugar, 1 tablespoon cinnamon and ¾ cup raisins.
- Rosemary: 1 tablespoon of dried rosemary.
- Chocolate chunk: ¾ cup dark chocolate chunks or chips.
The options are endless! Get creative!
Storing
Storing at room temperature
Before the bread is sliced, it can be stored at room temperature for 1-2 days uncovered. Once you slice into the bread, store in a plastic resealable bag for up to 3 days at room temperature. Although the outside of the bread will lose its crusty texture, the inside will stay nice and soft.
Freezing
You can freeze a whole loaf or slice the bread first. Wrap the bread in plastic wrap then place inside a resealable plastic bag and freeze for up to 3 months. Let thaw in the plastic bag at room temperature. Thawing in the bag helps the bread retain its moisture.
If desired, you can reheat the bread in the oven once it has thawed. To do so, wrap the bread in aluminum foil and place in the oven at 350 degrees for 10-15 minutes or until warm.

More recipes you'll love!


Did you try this recipe?
I'd love to hear from you! Leave a ⭐️⭐️⭐️⭐️⭐️ rating and comment below. I appreciate your helpful feedback! Follow me on Instagram, TikTok, Facebook and Pinterest for more delicious recipes!
Thanks so much! - Rachel
Easy No-Knead Crusty Bread
Ingredients
- 4 cups bread flour (or all-purpose flour*)
- 2 ¼ teaspoons instant yeast (1 packet) see notes for active yeast
- 2 ½ teaspoons salt
- 2 cups warm water (110 - 120°F)
Instructions
- In a large bowl, mix together the flour, yeast and salt.
- Pour in the warm water and use a sturdy spoon to mix together until fully combined. The dough should be wet and shaggy, but not runny.
- Cover the bowl with plastic wrap and let rise for about 2-3 hours, or until doubled in size.
- Optional: once the dough has doubled in size, you can store it covered in the refrigerator for up to 12 hours for enhanced flavor development, or continue to follow the instructions below to bake right away.
- When you're ready to bake, place the dutch oven with the lid on into the oven and preheat the oven to 450°F.
- Once the oven is preheated, lighlty sprinkle a work surface with about a tablespoon of flour. Scrape the dough out of the bowl onto your floured surface and roughly shape into a ball. No need for it to be perfect. It'll look nice once it bakes. Place the dough ball seam side down on a sheet of parchment paper.
- Once the oven is preheated, remove the hot dutch oven and transfer the parchment paper with the dough to the dutch oven. Cover with the lid and bake for 30 minutes. Remove the lid and bake an additional 10-15 minutes until golden and crispy on top.
- Lift the parchment paper with the bread from the dutch oven and let cool for 1 hour, then slice and enjoy!
Notes
Using active yeast:
Ingredients:- 4 cups bread flour (or all-purpose)
- ¾ teaspoon active dry yeast
- 2 ½ teaspoons salt
- 2 cups warm water
- Follow instructions above through step 2.
- Cover the bowl and place in a warm spot. Let rise overnight, about 12-18 hours.
- Resume with step 5 above.
*All-Purpose Flour:
- Bread flour has a higher protein content, giving the bread that more soft and chewy texture we all love when it comes to crusty bread! So, for the best results, I recommend bread flour, BUT all-purpose flour will still work and your bread will still taste delicious! So, use all-purpose if that's what you've got!
Nutrition
Nutritional information is automatically calculated by a third party software and is only an estimate, not a guarantee. This information is provided as a courtesy, and you are solely responsible for all decisions related to your health.


Candy Ward says
As promised, this recipe is easy to make, saves so much time, and tastes really good. I’m looking forward to trying add-ins like cinnamon and raisins.
Rachel Kochlin says
I'm so glad you enjoyed it! That's exactly what I love about this recipe: simple, time-saving, and delicious. Cinnamon raisin is one of my favorite inclusions!
Heather says
I only had active dry yeast, didn’t want to wait 12 +hours so I bloomed the yeast with the water and made it as it was active/ rapid rise yeast and it turned out perfectly
Rachel Kochlin says
Thanks so much for sharing, Heather! I'm happy to hear you had great success with active yeast!
Lou says
My husband attempted to make this bread today. It was so sticky he couldn’t get it off his hands . He threw it out . He is going to try it in tomorrow . Help.
Lou says
The dough was a sticky mess. What happened? We threw it out.
Rachel Kochlin says
No-knead dough is actually meant to be quite sticky, so that part is completely normal! It won't feel like a traditional kneaded bread dough. Using well-floured hands and a floured work surface can make it easier to handle. I'm sorry it didn't work out this time, but I hope you'll give it another try. I recommend just baking it as is to see how it turns out - the finished loaf often surprises people in a good way!
Donna says
The bread did not brown up as much as it shows in the picture? Any ideas?
Rachel Kochlin says
Donna, I'm sorry to hear the bread didn't brown as much as you had anticipated. A couple things come to mind. Did you remove the lid after 30 minutes and continue to bake another 10-15 minutes without? It should brown pretty quickly once the lid is off. Another thing to note is that oven temperatures can vary quite a bit, and if your oven runs cooler, the crust may not get as dark. You can always check the temperature of your oven using an oven safe thermometer. Hope that helps!
Donna says
Followed recipe in fact left in 20 minutes. Bread was delicious just not as browned.
Also what if you don't have a cover for your Dutch oven?
Rachel Kochlin says
If you don't have a lid for your dutch oven, you can try covering with a sheet pan.
Sam says
So easy to make, bake and share! 4 ingredients and 5 m8nute prep!
Delicious with super moist, chewy inside, crusty, crunchy crust. Mmm.
Rachel Kochlin says
Thanks so much for leaving a review, Sam! Always happy to hear others love the recipe as much as I do!
ER says
Baked the bread two days ago. I followed the instructions by leaving the bread in the refrigerator and baking it the following morning in an enamel steel oval roaster pan with lid…the crunchiness was superb. Thanks for the recipe.
Rachel Kochlin says
That's so wonderful to hear! Thanks so much for giving my recipe a try and leaving a review!
Libby says
This bread is seriously easy and fabulous! I followed the exact recipe the first time and have started adding seasonings, caramelized onions, fresh garlic, etc. Highly recommend!
Also, I don’t have a Dutch oven and it still turns out perfect. 🤩
Rachel Kochlin says
Libby, that's wonderful to hear! Those inclusions should delicious, especially caramelized onions! Thanks so much for leaving a review!
Jenn Z says
Hello, Im making my 2nd loaf of this bread. The 1st one was delicious. I used AP flour since thats all I had. It was way too sticky to work with to shape it into a ball or do anything with even with flour on my hands and sprinkling on the dough and surface. It still came out tasty. Very heavy bread. The 2nd one I left in the fridge overnite. Its in the oven now. I didnt know I should of left it out for awhile before baking so we shall see how it turns out. But this batch was still too sticky to work with. I should of tried adding more flour. IDK but next time I am trying the bread flour. Maybe it needs more ap flour than the bread flour??? Not sure. BUT I am sure of one thing I will be making this bread forever. Its delicious and simple to do. Tastes great heated in the microwave then add some butter. Yum! Toasted to is good with eggs.
Rachel Kochlin says
Jenn, I'm so glad you loved the first loaf and your enthusiasm to make it again! No-knead bread dough is a bit stickier than traditional kneaded dough, so a well-floured surface and hands can help. Another thing to keep in mind, all-purpose flour doesn't absorb liquid as well as bread flour, so I recommend using bread flour if you can. You'll also get better structure using bread flour becaues of it's higher protein content. Hope that helps!
JennZ says
I finally tried it with bread flour. So much better! The crust is amazing! Its so delicious! I think I've made 4 loaves now! Lol. We love it. I want to try adding different flavors like you mentioned. How would I go about doing that? Should it be done after it raises or before? Mix in seasonings on the initial mixing?
Rachel Kochlin says
Jenn, that's wonderful! I'm so glad you're having better results with bread flour! Thanks so much for sharing an update. When it comes to adding inclusions, it really depends on the type of inclusion. For example, when adding something like rosemary or Italian seasoning, I like to add that in when I'm first mixing up the dough. For making something like cinnamon raisin bread, it's best to add the inclusions right before shaping. So you'll stretch out the dough on your work surface, sprinkle the inclusions over the top (you can fold the sides up and sprinkle on more inclusions if desired), then roll it up and shape. Hope that helps!
Catherine Martignetti says
I’m not sure if I did something wrong, it came out somewhat raw, after 45+ min in oven as instructed. I’ve made sourdough plenty of times, so I have bread experience, but for some reason this just didn’t bake right. Crust looked beautiful, but it was a small loaf and like I said dense and very doughy inside.
Rachel Kochlin says
Catherine, thanks for sharing your experience. I'm sorry the bread didn't turn out as you for! This recipe has worked well for many readers, so I'm happy to help you troubleshoot. Did you let the bread cool completely before slicing? Cutting into bread while warm can make the crumb seem gummy and doughy. One other thing to keep in mind is that oven temperatures can vary, which may affect bake time. Make sure the bread reaches an internal temperature of about 205-210°F before removing from the oven. One last thing, under or over proofed dough can cause issues. Make sure the dough no more than doubles in size. I hope this is helpful!
Alison Maloney says
Easy, wonderful tasting bread recipe!
Erin says
I’m new at baking bread. This recipe is great and super easy. I don’t have time to mix and proof and bake it in one day, so I’ve let it cold proof in the fridge for 24 hours then sit on the counter ~45 min before baking. Works beautifully. Also don’t have a Dutch oven so I use an oven safe pot and glass lid. Also! I sub about 3/4 cup whole wheat flour and it’s excellent.
Kati says
This recipe is a great base to throw whatever flavors you want in, but it's good enough on its own that you don't have to. Trying it this weekend with bread flour vs ap and olive oil, garlic, amd parsley mixed in. Sitting to proof now so we will see how that tastes🥰
Rachel Kochlin says
Love that you're putting your own spin on it! Garlic and parsley sounds delicious - I hope it turns out as tasty as it sounds!
Jen Sachleben says
I have tried several bread recipes and thought bread might just not be my thing but this came out so well! The crust was crispy the chew on the inside was perfect. Definitely keeping this recipe!
Rachel Kochlin says
Yay! That makes me so happy, Jen!! Thanks for giving my recipe a try and leaving a review!
Christi says
This is super easy and delicious!
Rachel Kochlin says
Love hearing that! Thanks for sharing, Christi!
Jan says
Bread is in the oven, but not sure how it will turn out. It was very difficult to shape into a ball (even a shaggy one) as the dough was constantly sticking to my hands.
What did I do wrong?
Rachel Kochlin says
If the dough is really sticky, flouring your hands can help! I have no doubt it'll still taste delicious! I'd love to know how it turned out!
Courtney says
I don’t know what I did wrong. The parchment paper stuck to my bread.
Rachel Kochlin says
Courtney, I'm sorry that happened! Can you confirm that you used parchment papper and not wax paper? I've never had an issue with parchment sticking to bread. My only other thougt is that the dough was too wet or the parchment paper got wet somehow?